Tuesday, May 7, 2024

How to Add Zipper and Fabric Lining Explained with Photos and Video Tutorial for Crochet Fanny Pack with Zipper Lining


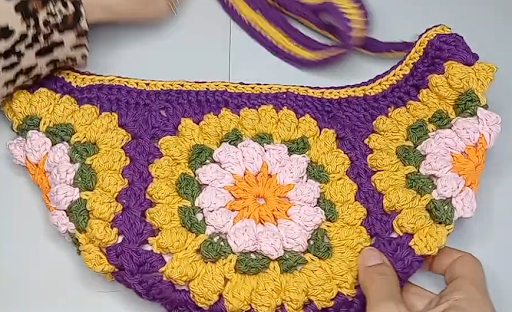
Learn how to elevate your crochet fanny pack game with this comprehensive tutorial on adding a fabric lining and zipper. Whether you're a seasoned crocheter looking to take your creations to the next level or a beginner eager to learn new techniques, this step-by-step guide has you covered. Discover how to seamlessly integrate a fabric lining into your crochet fanny pack, providing both functionality and style. Follow along as we demonstrate how to insert a zipper, transforming your handmade accessory into a practical and chic storage solution. With clear instructions and helpful tips, you'll master the art of lining crochet fanny packs in no time, creating personalized pieces that are as functional as they are fashionable. Say goodbye to loose items and hello to organized storage with this DIY project that combines the charm of crochet with the practicality of a fabric lining and zipper closure.


 Let's dive in!


Step 1: Prepare the Materials: Zipper, fabric, Sewing Needle and thread or a Sewing machine, Scissors, Pen

First off, ensure you have your zipper ready. It doesn't need to span the entire length, as it only requires enough to open partway. Measure the appropriate length for your bag, keeping in mind the size of your fanny pack.


Step 2: Trace the Lining

Place your bag on the lining fabric and use a pencil to trace around it, leaving about half an inch for sewing allowance. Be mindful of any adjustments needed for size differences between your bag and the traced outline.


Step 3: Fold and Cut

Fold the lining fabric in half, ensuring symmetry, and cut along the traced outline, starting from one corner to the other. This will create two identical halves for your lining.


Step 4: Secure the Sides

Fold each half of the lining from the cut towards the middle, ensuring symmetry. Use a pencil or pin to trace along half of the previously traced line, ensuring accuracy and consistency between both halves.


Step 5: Centering the Zipper

Fold your lining in half to find the center point. Mark this point with a pin or pencil. Similarly, mark the center points on both ends of your zipper. Align the center points of the lining and the zipper, ensuring they match up.


Step 6: Pinning the Zipper

With the zipper facing downwards, align the center points of the zipper with those of the lining. Pin them together along the edges to secure them in place.


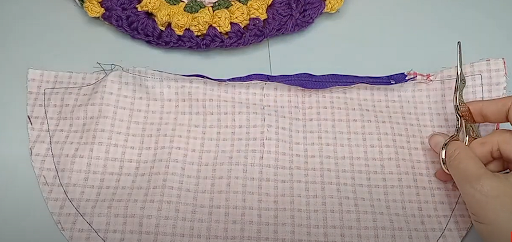
Step 7: Sewing the Zipper

Using a needle and thread or a sewing machine, stitch the zipper to the lining along the pinned edges. Ensure that the zipper is securely attached, and the stitches are neat and tidy.


Step 8: Sewing 

-by Hand

Thread your needle with and make a knot at the end. Beginning about a quarter of an inch from the edge, start sewing along the traced line using backstitches. Repeat this process until you've sewn around the entire outline.


-with a Machine

Alternatively, if you have access to a sewing machine, you can use it for quicker and more precise stitching. Follow the traced lines, ensuring to maintain consistent seam allowances.


Step 9: Finishing Touches

Once the zipper is attached, fold the lining back into shape, ensuring the zipper operates smoothly. Trim any excess threads, and your lining is now ready to be inserted into the fanny pack.


Step 10: Final Adjustments

Check the fit of the lining within the fanny pack, ensuring it sits neatly and doesn't obstruct the zipper. Make any necessary adjustments or trimmings to achieve the desired fit.


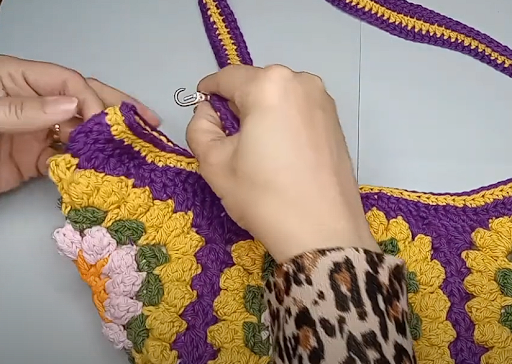
Step 11: Securing the Strap

If desired, you can now attach a strap to your fanny pack for easy carrying. This can be done using fabric scraps or purchased straps, depending on your preference.


And there you have it! With the lining sewn and attached, your fanny pack is now complete and ready for use. Feel free to experiment with different fabrics and designs to personalize your creation further. Thanks for watching, and happy crafting!


Written Pattern for Crochet a Yip Yip Aliens and Video Tutorial


 Embark on a whimsical crochet journey as you bring to life the iconic Yip Yip Aliens through the art of crochet. This extensive tutorial offers a comprehensive guide, complete with detailed instructions and a written pattern, suitable for crocheters of all levels. Whether you're a novice eager to learn the fundamentals or a seasoned crafter seeking a new challenge, this tutorial provides a roadmap for every step of the process. From selecting the perfect yarn hues to mastering intricate stitches, you'll gain valuable insights and techniques along the way.

At the core of this tutorial lies the sheer delight of crafting these beloved characters with your own hands. The Yip Yip Aliens, renowned for their eccentric appearance and inquisitive demeanor, have captivated hearts across generations. With this crochet tutorial, you'll have the opportunity to fashion your own personalized renditions of these endearing beings. Whether you opt for a faithful replication or infuse your unique flair, the creative possibilities abound.


The journey commences with gathering essential materials, including yarn in various shades, crochet hooks, and any desired embellishments. Choosing the right yarn hues is pivotal to capturing the essence of the Yip Yip Aliens, encouraging exploration of diverse combinations and options. Once armed with the necessary supplies, you're ready to delve into the enchanting realm of crochet and commence materializing your vision.

The accompanying written pattern serves as your guiding compass, navigating you through each stage of the crochet odyssey. From crafting fundamental shapes to adding intricate details, each step is meticulously elucidated, accompanied by illustrations and photographs. Whether you prefer following written instructions or learning visually via video tutorials, this tutorial caters to diverse learning preferences.


As you diligently work through the pattern, you'll witness the gradual emergence of your Yip Yip Aliens, inching closer to fruition with every stitch and row. Each stitch contributes to their evolving form, fostering anticipation for the eventual unveiling. Throughout the journey, should you encounter hurdles or queries, fear not – this tutorial is tailored to provide unwavering support at every turn. Troubleshooting tips and solutions are proffered to aid in surmounting challenges and achieving optimal outcomes.

Among the most gratifying aspects of crochet lies the profound sense of accomplishment that accompanies completing a project. As you finalize each Yip Yip Alien, a surge of pride washes over you, recognizing that you've birthed something truly extraordinary and singular. Whether destined for display as decorative pieces or bestowed upon loved ones as cherished gifts, they promise to evoke joy and wonder.

Yet, the adventure persists as you venture forth to crochet a functional and distinctive accessory: a Dungeons and Dragons dice bag inspired by the whimsy of Yip Yip Aliens. This practical item marries utility with whimsy, rendering it the perfect accompaniment for your gaming endeavors. Compact in size and resilient in construction, it serves as an ideal vessel for housing dice and other gaming essentials.

The crochet pattern for the dice bag builds upon the skills honed while fashioning the Yip Yip Aliens, introducing fresh techniques and challenges. From working in the round to sculpting the bag and bestowing finishing touches, each stitch expands your crochet repertoire. And akin to the Yip Yip Aliens, the written pattern furnishes detailed instructions and invaluable tips to shepherd you through the process.

As you crochet the dice bag, you're afforded the opportunity to infuse it with your distinctive style and preferences. Opt for yarn hues that reflect your favored D&D character or theme, or embellish it with buttons, beads, or embroidery for a personalized touch. The realm of possibilities stretches as far as your imagination allows, beckoning you to explore and customize.

Upon completion, your dice bag stands as a testament to your craftsmanship and ardor for gaming. Whether rolling dice within the confines of your abode or confronting adversaries at a convention, your handmade bag will evoke admiration from fellow adventurers. And as you continue your crochet voyage, you'll carry with you the memories of the Yip Yip Aliens and the proficiencies acquired throughout the odyssey.

In summation, this tutorial offers a comprehensive and delightful means of learning crochet while crafting two distinctive and memorable projects. Whether you're a neophyte or a seasoned hand, there's something within these pages to ignite your creativity and passion. So, grasp your crochet hook and yarn, and set forth on an adventure brimming with whimsy and imagination

Written Pattern: ow 1 12 double crochet (dc) Row 2 increase (24dc) Row 3, inc, 1dc (36) Row 4-5-6-7-8 (36dc) Row 9 ch2,1dc, 3dctog, 7dc, 3dctog, 7dc, 3dctog, 2dc (27) Row 10 ch2, 1dc, 3dctog, 4dc, 3dctog, 4dc, 3dctog, 2dc (21) Row 11 ch2, 1dc, 3dctog, 1dc, 3dctog, 1dc, 3dctog, 2dc (15) Row 12 ch2,2dctog, 3dctog, 3dctog (9) eyes Row 1 magic ring, 5sc Row 2 increase (10) Row 1 10sc


add fringe